Saturday, August 11, 2012

Ground Beef Day


Two days ago I made more freezer meals than I ever have in one day, and it honestly went rather well! To make things easier on myself I made all of my ground beef meals together. In this cooking session I made and froze: 2 gallon-sized bags of beef chili, 6 quart-sized bags of meatballs, 3 quart-sized bags of taco beef, 1 gallon-sized bag of beef and kidney bean potato topping, and two 9x9 black bean and rice bakes. I have NEVER had this many meals socked away in the freezer, and it feels AMAZING!!! I only have 9 days until I go back to school (and we will be in Florida for 8 of those days!!:) so freezer cooking is my main focus right now, as lame as that sounds for A 23-year-old. ;)  

Anyhow, since my little family of two <3 only eats beef about twice a week, these meals should last us awhile!

This is how we do it ;)
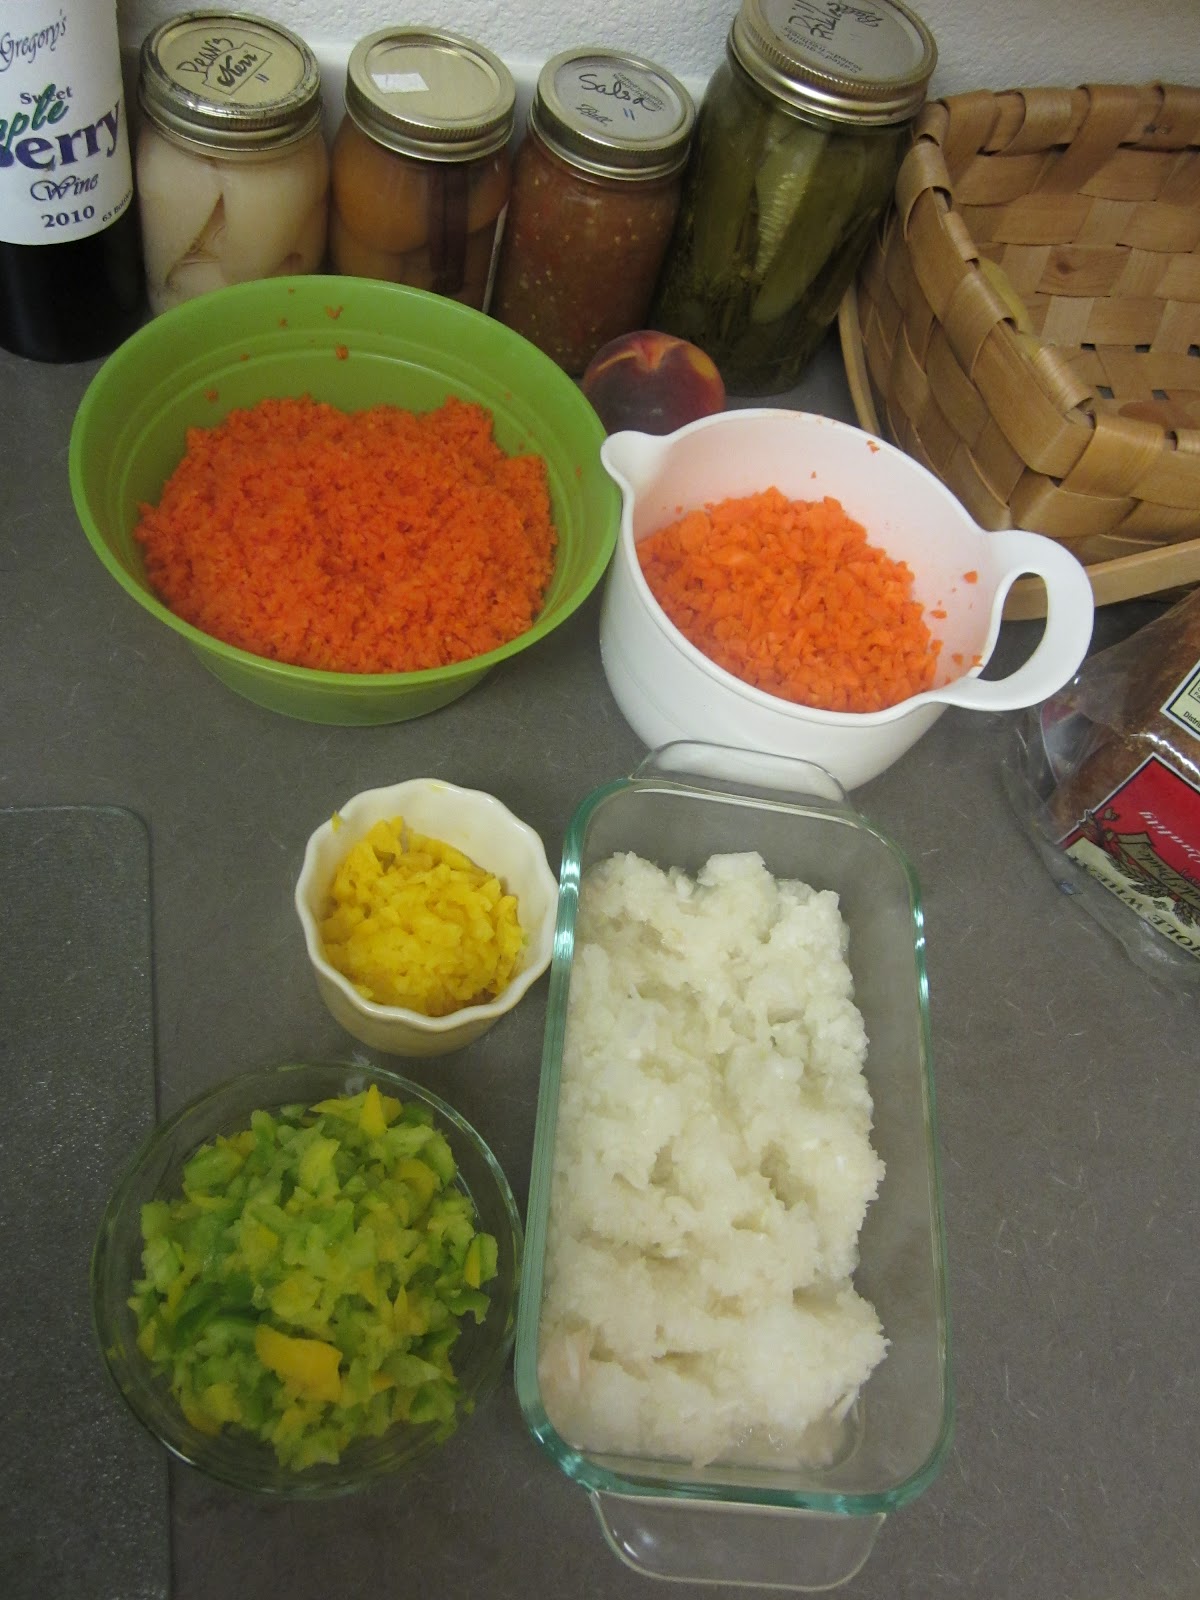
First, I always like to get out all of the produce and canned goods that I will need. That way I am not scrambling to find something that I may not even have, in the middle of cooking a meal. Plus, it looks so beautiful!


When making multiple recipes, I try to prep things together as much as possible. For example, I add super finely diced carrots, onion, and bell peppers to my chili, meatballs, taco beef, and beef and bean potato topping. So, instead of dragging out the food processor multiple times, I basically just finely dice a big bowl of each veggie and use them throughout the cooking session.

Pureed Roasted Garlic:

Last week I put myself through the misery of peeling 7 bulbs of garlic. Then I wrapped it all up with a little oil (grapeseed oil, my favorite many-purpose oil) in small foil packets. After roasting it in the oven for a half hour or so, I pureed it. Then, I froze it solid in spoonful sized dollops on wax paper. After it was frozen into solid little chunks, I tossed them into a quart-sized freezer bags, labeled, dated, and popped them back into the freezer. Now I have yummy roasted garlic to add to meals without any extra work! I threw some into all of my ground beef meals. :)


Lazy Laura’s Chili:

This chili is super easy! Just combine all of the ingredients and simmer on the stove top for 2-3 hours.

1 ½ lbs. ground beef, browned with 1 cup diced onions and 2 tablespoons minced or roasted & pureed garlic.

2 cups cooked pinto beans (cook from dry to save money and sodium, or used canned)

2 cups cooked kidney beans (cook from dry to save money and sodium, or used canned)

1 cup finely diced carrots

1 cup finely diced bell pepper

3 cans diced or stewed tomatoes

1 small can tomato paste

1 Tablespoon Chili powder

½ teaspoon cumin

½ teaspoon black pepper

A sprinkle (or more) of cayenne pepper


This is what you get after simmering it for a few hours:


To Freeze Soups:

Cool the soup pot in an ice bath, stirring occasionally. Then pour into gallon-sized freezer quality bags and freeze the soup FLAT. Freezing meals flat, instead of in big blocks, enables the food to freeze faster so that fewer ice crystals form and the quality of the food is preserved. Of course I had to take out a bowl of chili for my lunch before freezing the rest! MMM!


BAKED POTATO TOPPING:

I found this meal idea in a freezer cooking book and it reminds me of a lazy version of Shepherd’s Pie, which I love! Basically you just cook up some ground beef or turkey, diced onions, garlic, diced carrot and peppers if you like, whatever spices you like and a can of drained kidney beans if you please. Freeze this meal flat in a plastic bag, and when you want it for dinner heat it in a skillet and throw it on top of baked potatoes!


ANYONE CAN MAKE TACO BEEF!

Just freeze it flat and then reheat in a skillet and throw on tacos, burritos, or our favorite: NACHOS!


My recipe for meatballs is in an earlier post, but here is a picture of our scrumptious BBQ meatball dinner from last night. (And by the way that is a Yukon gold potato, NOT a cup of butter on it. Hahaha)


Well, I better go get to work. Today is supposed to be my “chicken day”. Lol

-Lazy Laura


Wednesday, August 8, 2012

Sloppy Turkey Joes & Chicken Patties

Today I drug the TV into the kitchen, rented some movies, made a big iced coffee, and got to work. I made 4 different recipes for the freezer: turkey sloppy joes, chicken patties, 13 bean and ham soup, and white chocolate macadamia nut cookies. I'll share the first two recipes in this post. :)

When I'm making multiple recipes for the freezer, I like to cook meals that have similar ingredients at the same time. This makes things easier because you can combine some of the prep work for the recipes, and I am all about saving time and effort! Haha ;) I add finely diced carrots, onions, and bell peppers to all three of these dinners, so I used my best friend (a.k.a. my food processor) to prep them all.


Turkey Sloppy Joes:

1. In a large skillet, combine 1/2 cup finely diced carrot, 1 cup finely diced onion, 1 cup finely diced bell pepper, and 1 tablespoon diced garlic or roasted garlic puree. Cook veggies for just a few minutes.

2. Add 1 1/2 - 2 lbs of ground turkey, and continue cooking until turkey is just done.

3. Add 1 (14 1/2 oz.) can of tomato sauce, 1/4 cup catsup, 1/8 cup hot sauce (I use Sriracha), 1 tablespoon Worcestershire sauce, 1/2 teaspoon dried oregano, and a sprinkle of black pepper. Simmer for a few minutes.

4. Cool the sloppy joe mixture in the fridge. Then pour the mixture into gallon sized freezer quality bags, LABEL, DATE, and freeze FLAT.


An oatmeal canister can come in super handy when you are alone in the kitchen and need to pour fillings or soups into freezer bags.


Freezing meals flat helps them freeze faster (which causes fewer ice crystals to form and helps preserve the quality of your meals) and defrost more quickly for those lazy dinners. :)

TO SERVE:
Defrost overnight or for for a few hours IN THE FRIDGE (never on the counter) and simmer for between 5 and 10 minutes on the stove top. Serve on hamburger buns.


CHICKEN PATTIES:
1. In a large bowl, mix 1 1/2 lbs. ground chicken, 3/4 cup bread crumbs, 1/2 cup finely diced carrots, 1/2 cup finely diced onion, 1/2 cup finely diced bell pepper, 3 tablespoons chicken broth, 3 tablespoons Sriracha sauce (or other hot sauce), 1/2 teaspoon dried sage, and a sprinkle of black pepper.

2. Form the meat mixture into nice thick patties and pan fry with a few teaspoons (okay who are we kidding here? Tablespoons!) of oil.


3. Before wrapping, freeze the patties until solid (about 2 hours) and then go ahead and package, label, date, and freeze them in freezer quality plastic bags.


TO SERVE:
Pan fry or bake at 375 degrees until warmed through.
Serve with baked/mashed potatoes, rice, and/or veggies.
Talk about an easy, lazy dinner!! :)


Tuesday, August 7, 2012

Freezer Meatballs

Whew! After 6 solid months of intense courses at WSU, I finally have a 3 week break before getting back into it. When I go back, I will be taking 18 credits each term for the next year in order to finish up my Bachelor's degree in Psychology. Basically, I am going to be one busy girl for the next 9 months! In order to lighten my load and decrease my stress, I'm stocking our freezer with dozens of meals for the busy school nights ahead. :)

Meatballs are an awesome addition to my freezer stash because they are so versatile. You can serve them with whatever sauce you like: marinara, BBQ, sweet and sour, or as swedish meatballs. Tonight we had them in marinara sauce on top of spaghetti squash. Mmmm :)


Here is how I make and freeze my meatballs:

Ingredients:
2 lbs. ground beef
3/4 lbs. ground pork or sausage
1 cup bread crumbs
1/2 cup super finely diced (in a food processor) onion
1 cup super finely diced (in a food processor) carrot [Sneak in those veggies where you can!!]
2 eggs, slightly beaten
1 Tsp. Worcestershire sauce
1 small can tomato paste
1 tsp. dried oregano


1. Mix all ingredients together very well.
2. Form meatballs (either using cookie scoop, spoon of some sort, or just your good ol' hands:)
3. Bake on tin foil on a baking sheet, for about 20 minutes at 375 degrees.
4. When done baking, place meatballs uncovered in the freezer on baking sheet or wax paper. Freeze for 1-2 hours until the meatballs are solid, then transfer into good quality freezer bags.
5. LABEL, DATE, and store in the freezer until ready to use.

When you are ready to eat the meatballs, throw them in a crock pot with sauce or bake the meatballs at 375 degrees for 10 minutes and then add to sauce on the stove top.


I've got a BUNCH more freezer cooking planned for the week, so stay tuned for more recipes!! :)


Friday, February 3, 2012

Cleaning Day Chicken


Tuesday was supposed to be my “buckle down and bust out some serious studying” day. However, when studying at home, I can usually find something to distract me from getting my work done. And Tuesday, I found a heckuva distraction. Since it was a beautiful 50 degree day, I went to open all the windows to get some fresh air inside, and that is when I discovered mold on our bedroom window sill. Ewwww!!! I am highly allergic to mold (what am I not allergic to though?!), not to mention it is NASTY, so the next four hours of my “study” day were spent bleaching all my windows and cleaning an already (fairly) clean house. Ugh.

Anyhow when I felt the cleaning frenzy coming on, I rummaged through the fridge and threw this in the oven so dinner would be covered. It turned out really yummy so thought I’d share. J


“Cleaning Day Chicken”


I used:

5 small boneless skinless chicken breasts

2 potatoes, peeled and roughly chopped

3 large carrots, peeled and roughly chopped

1 zucchini, sliced thick

½ red bell pepper, chopped

¼ cup chopped onion

¼ cup BBQ sauce

½ can chicken broth

Pinch of salt and pepper


Starting at the bottom of my “bean pot”/deep casserole dish I layered the potatoes, zucchini, chicken, BBQ sauce, carrots, bell pepper, onion, salt, pepper, and then I poured the chicken broth over it all.
I baked it at 350 for about 3 hours, and PRESTO!


Feel free to substitute whatever vegetables you and your household will actually eat. I figure most any kind of squash or potato would fit right in with this dish. My favorite part was the carrots. Cooking in that little bit of BBQ sauce all afternoon definitely did those carrots a favor! J

Tuesday, January 24, 2012

Perfected Shepherd's Pie


I have been making and perfecting my Shepherd’s Pie for about 7 years now. At this point, I don’t know that this recipe could get any more perfect. I know I am tooting my own horn here, but this recipe is that good! For those of you who have been living under a rock your whole life, a Shepherd’s Pie is a beef, vegetable, and tomato sauce casserole topped with mashed potatoes and cheese.
About a month ago when I first started to do a little freezer cooking, I made a big batch of the beef-and-vegetable filling for Shepherd’s Pie and froze enough to make 2 large casseroles. Well last night for the first time I made this dish using the frozen filling, and it was PERFECT! I did make fresh mashed potatoes to top my casserole, so it wasn’t quite as speedy as most of my from-the-freezer dinners. However, definitely worth it!!
* Freezer Foods Tip: [I haven’t personally tried freezing potatoes of any kind yet, but I have read (and would imagine) that white potatoes do not freeze well. I can’t imagine mashed potatoes retaining their creamy texture after being frozen. Yuck.]

**SUPER LAZY NOTE: I have used pre-made Country Crock mashed potatoes in a pinch once when I didn’t make enough mashed potatoes, and it was fine. Now that I think about it, mashed potatoes from the deli at the grocery store would probably be cheaper than the plastic tub style.


Below are my original directions (written down for the first time) to make and freeze enough beef-and-vegetable filling for TWO large Shepherd’s Pies. J


~LAZY LAURA’S PERFECTED SHEPHERD’S PIE~

First, you will need to gather your ingredients. Shepherd’s Pie is extremely versatile so feel free to leave out the ground beef or substitute ground turkey. Add or omit any vegetable depending on your tastes. This meal can pack a powerful nutritional punch, so be sure to add any and all vegetables that your family will eat. All vegetables combined well in this dish so go crazy! Romanesco Cauliflower and fresh yellow squash have been some of my favorite seasonal additions.


~Ingredients for Filling~

1 lb. extra lean ground beef

4 cups of spaghetti sauce (Prego for me)

1 small can tomato paste

Pinch of salt, pepper, and oregano

½ sweet or yellow onion, diced

3-5 cloves of fresh garlic, minced

1 small head of broccoli, chopped

5 carrots, peeled and sliced

1 red bell pepper, diced

2 small zucchini squash, sliced and quartered

1 can kidney beans

1 can green beans

1 cup frozen corn

1 cup frozen peas


STEP 1: Prep all of your vegetables! Dice the onion and bell pepper, mince the garlic, chop the broccoli, peel and slice carrots into bite sized pieces, and slice and quarter the zucchini.

STEP 2: Brown ground beef in LARGE skillet. Add onions and garlic to the meat in the last few minutes of cooking. Drain (if necessary) and transfer the meat to a bowl. Wash your skillet.

STEP 3: Then I add my broccoli, carrots, and a 1/3 cup of water to the large skillet, cover, and cook on medium-low, for around 5 minutes to soften them up a bit. Then I add the bell pepper, zucchini, and any other fresh vegetables you are adding, and cook for several more minutes.

STEP 4: Add spaghetti sauce, tomato paste, salt pepper, and oregano. Heat through. Stir cooked ground beef into the sauce mixture. Then add all canned and frozen vegetables (including kidney beans).


STEP 5: Pray your skillet can hold all of this. Stirring occasionally, heat this beef-vegetable-sauce mixture through on medium-low.

STEP 6: Transfer the filling to TWO, LABELED gallon sized Ziploc freezer bags. Freeze them flat. I would NOT use a freezer bag with a slider seal for this dish since it definitely has some liquid to it.


~When you want Shepherd’s Pie for dinner~

STEP 1: Pull the bag of filling from the freezer and put it in the fridge to thaw the night before (or at least a few hours before) you want to cook it.

STEP 2: Heat filling through in large skillet on medium-low.


STEP 3: Make a decent sized batch of mashed potatoes. [Peel and boil potatoes, drain, add butter, milk, salt, then mash. ‘Nuff said.] After many times of running out of potatoes before covering my whole casserole, I now mash about 12 potatoes.

STEP 4: In a large casserole dish or a 9 x 13 cake pan, pour in and level meat-vegetable-sauce mixture. Dollop on the mashed potatoes, and then spread them to cover the casserole. Sprinkle cheddar cheese (Tillamook!!) on top.

STEP 5: Bake in a 350° oven for about 30 minutes. Then slice and enjoy!


Monday, January 23, 2012

Chocoholic's Dream Cookie


While I would definitely describe myself as an avid cook, I admittedly do not bake much. This is probably not the worst thing in the world considering neither Jordan nor I are able to exert any measure of self-control when faced with sweets. (I’m pretty sure he admitted to eating 10 cookies last night.)

Anyhow, this past Christmas Eve I had to work at my old job mixing paint, so I decided to bring in a homemade treat, to make being stuck at work suck a little less for everyone.

When cooking with my usual ingredients of meats, vegetables, pastas, and cheeses I don’t follow recipes, I just follow my gut. However, baking is another beast entirely, and therefore I tend to follow other’s recipes for most goodies.

Allrecipes.com has yet to give me a true failure of a recipe, so while searching through their desserts; I came across the dream cookie of any chocoholic. The recipe is called Chocolate Pile-Up Cookies by user bansidhewail, and can be found at the following web address:


To make these dreamy chocolate cookies you will need:


·         2 cups all-purpose flour

·         ¾ unsweetened cocoa powder

·         1 teaspoon baking soda

·         1 teaspoon salt


·         1 cup unsalted butter, at room temperature (Tillamook all the way!)

·         ¾ white sugar

·         ¾ cup brown sugar

·         2 eggs

·         2 teaspoons vanilla extract

·         2 tablespoons coffee-flavored liqueur (Kahlua:)

·         1 cup semisweet chocolate chips

·         1 cup milk chocolate chips

·         1 cup white chocolate chips

·         1 cup finely chopped toasted hazelnuts (I left those out this time)


Here are the directions (almost) how they appear on allrecipes.com:

Step 1: Preheat the oven to 375°. Line baking sheet with parchment paper (THE best way to bake cookies!).

Step 2: In a bowl mix the flour, cocoa powder, baking soda, and salt.


Step 3: In another bowl, beat together the butter, white sugar, and brown sugar until creamy. An electric mixer would definitely come in handy here, but my boyfriend also does an awesome job. (Hey, he’s got to work off all those sweets somehow! ;) Then beat in the eggs, vanilla extract, and coffee liqueur.

Step 4: Gradually add the flour mixture to the butter-sugar mixture. Stir until well combined. Then stir in all of the chocolate chips and chopped hazelnuts.

Step 5: Drop by rounded spoonfuls onto a parchment paper lined baking sheet and bake in preheated oven for 8-10 minutes. Allow the cookies to cool on the baking sheet for 1 minute before removing to a wire rack to cool completely.


LAZY LAURA’S ALTERNATE STEP 5: Cookie dough almost always freezes well. This cookie recipe makes 5 dozen cookies, so I suggest forming half of it into rolls (like how you buy refrigerated cookie dough in the grocery store) and freezing them. I take a big blob of cookie dough (enough for about a dozen cookies), mold it into a small log, wrap it in parchment paper, then freeze in a gallon sized freezer bag. On a lazy afternoon or evening you can pull a roll out of the freezer, let it thaw slightly, slice, and bake following the recipe.
** Note: The following pictures look a little nasty. It would probably look a lot nicer with sugar cookie dough. Hehehe ;)


Then roll it up!

ALWAYS label and date your bags! :)

Sunday, January 22, 2012

Waffles

Late last night, in the middle of a Heroes marathon, the boyfriend and I
needed a midnight snack. Here is what we came up with...


A fresh waffle topped with peanut butter, sliced bananas, and maple syrup!


The reason I bring this up (besides to gloat) is that I always freeze waffles.
(I have a freezer bag of banana waffles in there right now.)
I just pop them into the toaster on those lazy mornings! ;)


I grew up on Bisquick waffles so that is generally what I make.
However I have also frozen waffles made from Krusteaz mix and from scratch.
I let them cool for a minute or two after cooking, then break them into squares,
and freeze them in a single layer in a gallon sized bag.

They keep for a week or so before becoming a little stale.


Some of our other favorite waffles to eat and to freeze are:
  •  Apple Cinnamon (add a few tablespoons of applesauce, a few tablespoons of finely diced apples, and a sprinkle of cinnamon to waffle batter)
  • Banana (mash a ripe banana into the waffle batter)
  • Chocolate Chip
  • Blueberry